Ice Cream Cake SOP

Signature Ice Cream Cake
Standard Operating Procedure
Ingredients for Sub Zero Signature Ice Cream Cakes 3
Birthday Cake Ice Cream Recipe 10
Chocolate Delight Ice Cream Recipe 11
Raspberry Cheesecake Ice Cream Recipe 11
Birthday Cake Recipe and Decoration Instructions 15
Chocolate Delight and Decoration Instructions 17
Raspberry Cheesecake and Decoration Instructions 19
Appendix A - Sub Zero Nitro Ice Cream Cake Prep Print Out 22
Appendix B - Birthday Cake Signature Cake Print Out 24
Appendix C - Chocolate Delight Signature Cake Print Out 25
Appendix D - Raspberry Cheesecake Signature Cake Print Out 26
Appendix E - Display Freezer Information, Price, & Specs 27
Signature Ice Cream Cake SOP
Introduction
Nitro Ice Cream Cake is a creation combining layers of delicious cake to our super cool nitrogen ice cream. This product is perfect for birthdays, anniversaries, holidays, graduations, and any kind of celebration. This SOP for Signature Nitro Ice Cream Cake follows Sub Zero safety standards for all products made using liquid nitrogen. Strict adherence to product, equipment, procedures, and training are required for authorization to sell this product.
Safety
As with all Sub Zero products made with liquid nitrogen, of primary importance is the prevention of employee and customer contact with liquid nitrogen. The selected cake, cream, mix-ins, frosting, equipment, and procedures for the preparation and serving of Nitro Ice Cream Cake were designed to prevent employee contact with liquid nitrogen during preparation and prevent against residual liquid nitrogen in the served product.
Ingredients for Sub Zero Signature Ice Cream Cakes:
Birthday Cake Ice Cream Cake
Rich’s Foods White Full Sheet Cake
Farrs 14% Original Cream
BetterCreme Vanilla Whipped Icing (Frosting)
Flavors Gourmet Cake Batter Flavor
Dawn Rainbow Sprinkles
Mother’s Circus Animal Cookies
Chocolate Delight Ice Cream Cake
Rich’s Foods Chocolate Full Sheet Cake
Farrs 14% Original Cream
BetterCreme Vanilla Whipped Icing (Frosting)
Hershey’s Chocolate Syrup
TR Toppers Chocolate Flakes
Kalva Candy Crown Chocolate Coating
Raspberry Cheesecake Ice Cream Cake
Rich’s Foods White Full Sheet Cake
Farrs 14% Original Cream
BetterCreme Vanilla Whipped Icing (Frosting)
Flavors Gourmet Cheesecake Flavor
Flavors Gourmet Raspberry Flavor
Dole Frozen IQF Raspberries
Red Food Coloring
Equipment
Required Equipment Summary
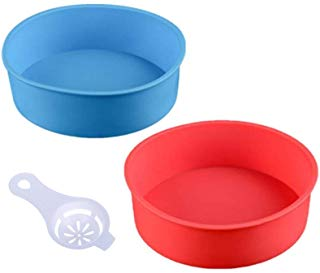
6” and 8” Round Cutter
6” and 8” Silicone Pans
2 oz Ice Cream Scooper
Ice Cream Spade
Straight knife with a long blade to cut the cake
Cake Frosting Smoother (Bench Scraper)
Off-set Spatula
8” and 10” Cake Boards
Cake Display Container (8” diameter, 2–3 tier high)
Cake Display Container (10’’ diameter, 2–3 tier high)
Display Ice Cream freezer that goes below -10 degrees F
Rotating Cake Turntable
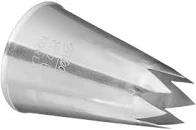
Disposable Piping Bags with star and round piping tips
Tablespoon Measure (mix-in scoop)
Food Scale with tare button
8 Quart Freezing/Mixing Bowl
Detailed Equipment Needed
The equipment has been selected to prevent employee contact with liquid nitrogen, and provide safe containment of liquid nitrogen. It also preserves liquid nitrogen, thereby minimizing waste. The required equipment that will be used in the creation of the Nitro Ice Cream Cake is listed as follows:
Smallwares Needed:
6” and 8” Round Cutter - approx. $3–6 each

Silicone Pan - approx. $11–13/set of 2
Note: Recommend to have at least six of the 6” and 8” pans for faster production, but will need a bare minimum of two. These pans are the same size as the cake cutters. Beware: Not all silicone pans are the listed size.
For the 6” pans:
For the 8” pans:

2 oz Ice Cream Scooper - approx. $7–10 each
Required Vendor: Webstaurant (Vollrath 47143 #16)

https://www.webstaurantstore.com/vollrath-47143-jacobs-pride-2-oz-dark-blue-16-disher/92247143.html
- Ice Cream Spade - approx. $3–4 each
-
https://www.libertywareusa.com/catalog/product/view/id/1367/s/spad/
A straight knife with a long blade to cut the cake - approx. $5–20 each

Cake Frosting Smoother (Bench Knife) - approx. $5–10 each

https://www.webstaurantstore.com/6-x-3-dough-scraper/694S196.html
Off-set Spatula - approx. $2 – 5 each

https://www.webstaurantstore.com/search/frosting-spreader.html
Cake Boards, 10” and 8” sizes - approx. $.21/round
10” Cake Board https://www.webstaurantstore.com/10-cake-circle-gold-laminated-corrugated-case/24510GCC.html
8” Cake Board
https://www.webstaurantstore.com/8-cake-circle-gold-laminated-corrugated-case/2458GCC.html
Cake Display Container

(8” diameter, 2–3 tier high) - approx. $0.525–0.56/container
(10’’ diameter, 2–3 tier high) - approx. $.92–1.00/container
Rotating Cake Turntable - approx. $16–35 each

Piping bag tips (large star and large round shaped tips) - approx $8-$10

Disposable piping bags - approx. $5–15/pack
Tablespoon Measure (mix-in scoop) - approx. $2.35/bag of 12 spoons

https://www.libertywareusa.com/catalog/product/view/id/1523/s/tbs-hd/
Food Scale with tare - approx. $8–10 each
8 Quart Freezing/Mixing Bowl - $6.60/12 bowls
Required Vendor: LibertyWare (#MB08)

https://www.libertywareusa.com/catalog/product/view/id/814/s/mb08/
Approximate Total Smallware Investment: $246-$265
Larger Investment Equipment Needed:
Display Ice-cream freezer that goes below -10 ℉ - approx. $1780-$2780
Recommend the two-door display freezer. Single door display freezers are available.
See buying info guide attached at the bottom in Appendix E.
DecoPac Printer Initial Investment: $499.52
Includes printer, ink, edible printer paper in 6” & 8” sizes, cleaner, and 10 licensed
image credits.
Note: Franchises are not required to buy the equipment through a specific vendor unless specified above.
Procedure
Preparation
Keep the whole sheets of cake frozen until you are ready to use.
Use gloves throughout the whole preparation and creation of the ice cream cakes. (ONLY exception is when making ice cream for the cake with liquid nitrogen.)
Take the Rich’s Chocolate or White Full-Sheet Cake out of the freezer. Allow it to thaw at room temperature for ½ to 1 hour.
Cake Layers
Cut out the cakes with the round cake cutters—either 6” or 8” cutter. Cut out all six cakes when you thaw the full sheet cake. Cut out your cakes according to the diagram below (not to scale) for minimal waste.

Place the newly cut round cake on a cake board and then place on the turntable.
Slice the round cake in half horizontally to create 2 layers of cake for your 6” or 8” cake. These 2 slices are the 2 cake layers of the ice cream cake.
Leave the first layer of cake on the cake board and secure the plastic wrap over the first layer of cake and the cake board.
Place the second cake layer on top of the first wrapped cake layer/cake board. Use the plastic wrap to cover the second layer of cake and secure the plastic wrap around both layers with the cake board. By wrapping the layers separately before freezing, it will be easy to separate the layers when it is time to assemble.
Date the wrapped cake layers. Place in the freezer to harden and leave until needed for an ice cream cake.
Finish cutting out the rest of the cakes from the full sheet cake as shown in Procedure Figure 1 above.
Cut and prep the rest of the 6” and 8” cakes as directed above in steps b.–f.
Store these pre-cut layers in the freezer so they are ready for assembly.
You will want to freeze all cake layers. Assembling the ice cream cakes with frozen cake layers will prevent the cake layers from getting compressed by the ice cream layers when assembling the Nitro Cakes. By preparing the cake layers in this manner: cake layers will separate easily, cake assembly time will decrease, and the highest cake quality will be ensured.
Type of cake needed for each signature recipe:
Birthday Cake - White Cake
Chocolate Delight - Chocolate Cake
Raspberry Cheesecake - White Cake
Ice Cream Layers
Cream Amount
Grab two mixing bowls. One ice cream layer will be made per mixing bowl, so you will need a total of two mixing bowls to prep the correct number of 2 layers needed for each cake order.
For the 6” cake, measure 12 oz of cream into each bowl. For the 8” cake, measure 16 oz of cream into each bowl. See table below for summary.
When making one 6” ice cream layer for the cake, you will double the regular ice cream standard recipe (6 oz of cream X 2 = 12 oz). Total amount of cream in a 6” cake = 24 oz (2 layers of 12 oz).
When making the 8” ice cream layer for the cake, you will double the large ice cream standard recipe (8 oz of cream X 2 = 16 oz). Total amount of cream in a 8” cake = 32 oz (2 layers of 16 oz).
Flavors and Mix-ins
Birthday Cake Ice Cream Recipe
Chocolate Delight Ice Cream Recipe
Raspberry Cheesecake Ice Cream Recipe
* Please watch the training video before proceeding to the following steps *
Ice Cream Layer Procedure
Freeze the 2 bowls of ice cream to a slight soft-serve consistency with our Nitrogen process. This will make it easy to spread in the 2 silicone pans.
Add one bowl of ice cream to the 6” or 8” silicone pan, smoothing the ice cream evenly with a spatula and/or spade. You can use an ice cream scooper to evenly space the ice cream inside the pan to make spreading easier. Be sure to spread the ice cream in the pan from the inside moving out. Push the ice cream down into the corner edge of the pan. Be absolutely sure that the ice cream has filled all the edges of the silicone pan before proceeding to the next step.
Repeat with second layer into another empty silicone pan. Put only one bowl/layer inside one silicone pan at a time and freeze separately.
Place both silicone pans filled with ice cream inside the freezer. The pans are silicone, so they are flexible. They need to be on a level surface with enough space to not squish the edges. If they are touching walls or other items, they will not freeze in their perfect circular shape, and it will be hard to assemble and frost the ice cream cakes. When the ice cream layers are frozen, they are now ice cream “pucks”.
Let them sit in the freezer overnight or until completely hardened. If the ice cream puck is tacky to the touch, it is not completely frozen.
You can prepare several ice cream pucks for storage by removing them from the silicone pans and placing them in ziplock bags or wrapping them in plastic wrap after they are frozen. Store them in the freezer until you are ready to make an ice cream cake.
Be sure to date and label the ice cream layers/pucks so you and your employees know what cakes they are for, what ingredients were used, and when it was prepared.
Cake Assembly & Base Coat
Cake Assembly
The cake assembly will be in the order as shown in Assembly Figure 1 above. Order is left to right, with the first cake layer on the cake board.
When the ice cream layers are completely frozen into pucks, retrieve two frozen, cut, and wrapped cake layers already prepared in steps above.
Unwrap the cake layers. Keep the bottom layer on the cake board, this is the first layer of the ice cream cake.
Place the cake board (with first cake layer) on the turntable.
Retrieve the frozen ice cream pucks from the freezer. Either unwrap it from the plastic storage or remove it from the silicone pan.
Place the first ice cream puck on top of the cake layer. This is your second layer of the ice cream cake.
Place frosting on top of the first ice cream layer and smooth out over the entire surface. This will help the ice cream cake layers stay together when the cake is being cut and served.
Place the second cake layer on top of the frosting. This is your third layer of the ice cream cake.
Place the last ice cream layer on top of the second cake layer. Make sure that the nice corner edge of the ice cream puck is on top. This is important, this is a nice clean edge to frost and decorate the top of the cake. This is your last layer of the ice cream cake.
If the ice cream layers are softening or melting already due to heat and handling, put the assembled cake in the freezer before proceeding to apply the base coat of frosting.
Frosting Base Coat
Remember that you are working with a frozen product. Work in a cool room and work as fast as you can. If the ice cream is starting to get soft, put it back in the freezer to firm up and then finish the frosting.
Place a mixing bowl on a food scale and tare. Add frosting to the bowl until you reach 8 ounces on the scale.
Have your assembled ice cream cake on the cake turntable. If you have placed the assembled ice cream cake in the freezer, retrieve it from the freezer, then put it on the turntable.
With a spatula, place all of the measured amount of frosting on top of the cake.
Slowly begin to spin the turntable. Use the offset spatula to push the frosting out from the middle of the cake and over the sides of the cake with an off-set spatula. Spinning the turntable will make it easier to evenly spread the frosting to all sides of the cake.
Smooth the frosting on the sides of cake until the frosting covers the whole cake. Keep your spatula up and down for the best and fastest coverage.
Once the frosting is on all sides of the cake, use the off-set spatula to fill in any frosting gaps.
Use a bench knife/frosting smoother to smooth out the frosting on the top and the sides. Start with the top of the cake. Use the edge of the bench knife to smooth the top of the cake while slowly turning the turntable to make an even glide. Place the bench knife smoother edge along the sides of the cake. Slowly turn the cake on the turntable to smooth the sides. Add frosting to the places where you can still see cake, and smooth again. On the top corner edge of the cake, gently pull excess frosting in towards the middle of the cake to remove excess frosting on the edges. Repeat as necessary until cake is mostly even and smooth. Remember to place back in the freezer for 10–20 minutes as often as is necessary to keep the cake frozen as you work. We are not looking for perfect frosting, we will be decorating over the top of the base coat.
Leaving the cake on the cake board, place the assembled and frosted cake in the freezer to harden back up for 10–15 minutes. This will solidify the cake to keep the ice cream from melting as you decorate. If you will not be decorating on the same day, place the cake in a plastic cake display container to prevent damage and off-flavors in the cakes.
Cake Decoration
Retrieve the assembled and frosted cake from the freezer.
Refer to the following instructional print-outs below for each individual cake decoration:
See detailed video training before proceeding to decorate the cakes.
This will give you needed information and visual examples of how to create the standard end product.
Birthday Cake Recipe & Decoration Instructions
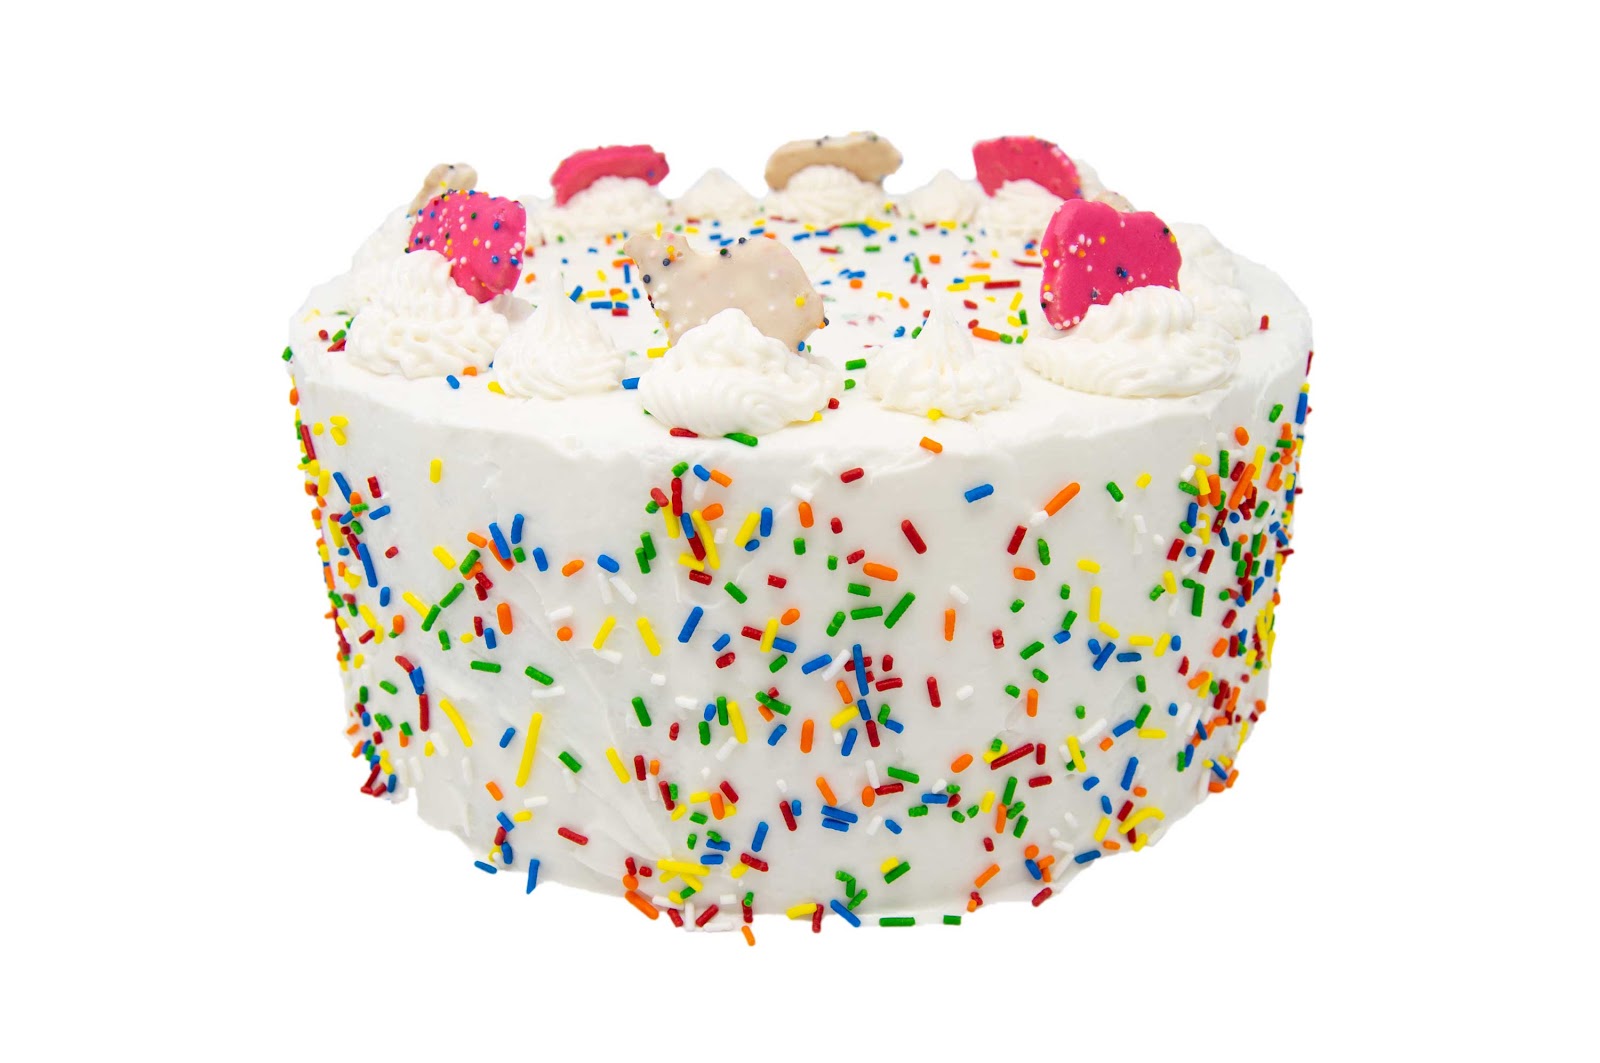
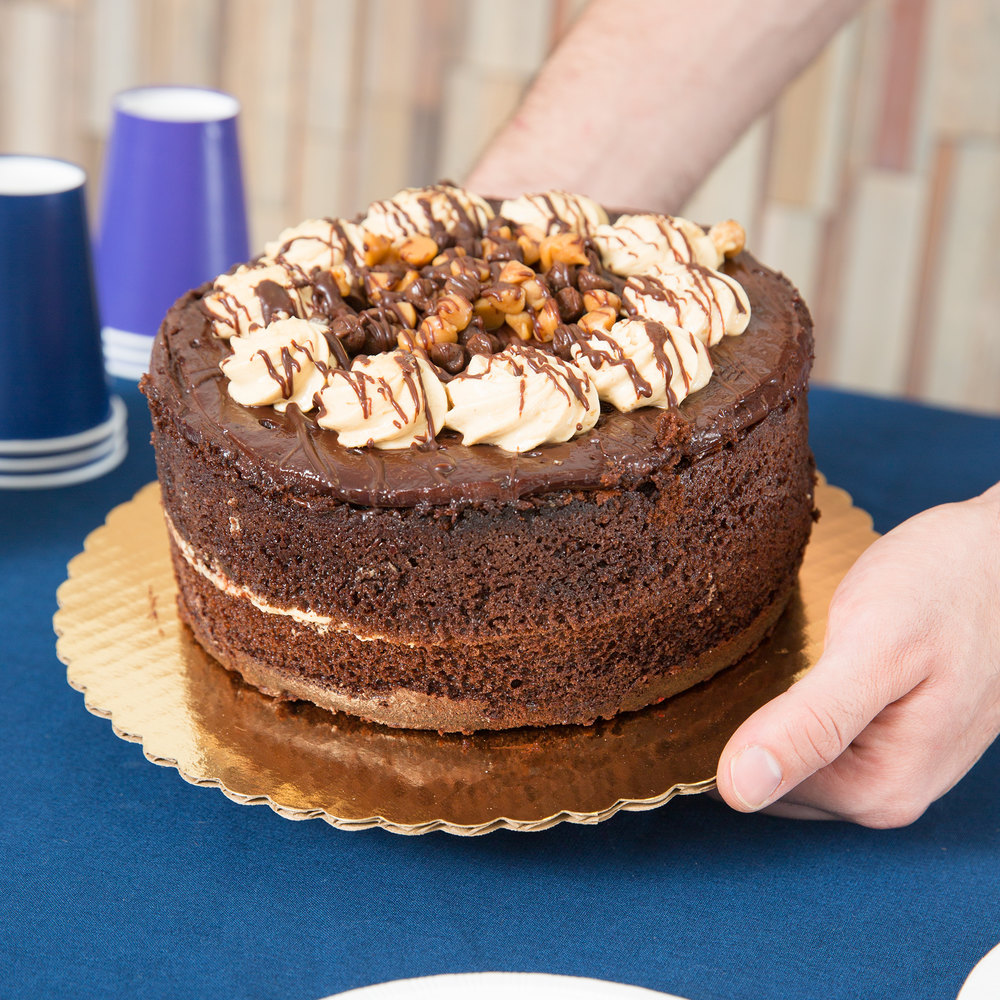
The Birthday Cake consists of two white cake layers, and two cake batter flavored ice cream layers with rainbow sprinkles mixed in. It is also topped with 8 pieces of animal cookies.
Ice Cream Layer Recipe
Note: Please watch the Birthday Cake Training Video before beginning the steps below.
Set aside 1 ½ tablespoons of sprinkles for the 6” cake and 2 tablespoons of sprinkles for the 8” cake.
Retrieve the cake from the freezer. Place the cake (with the cake board still attached) on the turntable with part of the cake and cake board being slightly over the edge of the turntable. Just ¼ –⅓ of the cake should be off the edge as to prevent the cake from falling off the turntable.
Place a plate under the hanging edge of the cake board.
Throw rainbow sprinkles randomly on all of the sides of the cake.
Remember to save at least a ½ tablespoon of sprinkles for the top of the cake.
Scrape the fallen sprinkles off the cake board edge and the plate. Reuse and apply the collected sprinkles to the cake sides to avoid waste.
Score/divide the top into 8 sections. You can use a device or visually estimate. Do not cut the cake, you are just making a visual line to accurately place your cookies and frosting rosettes.
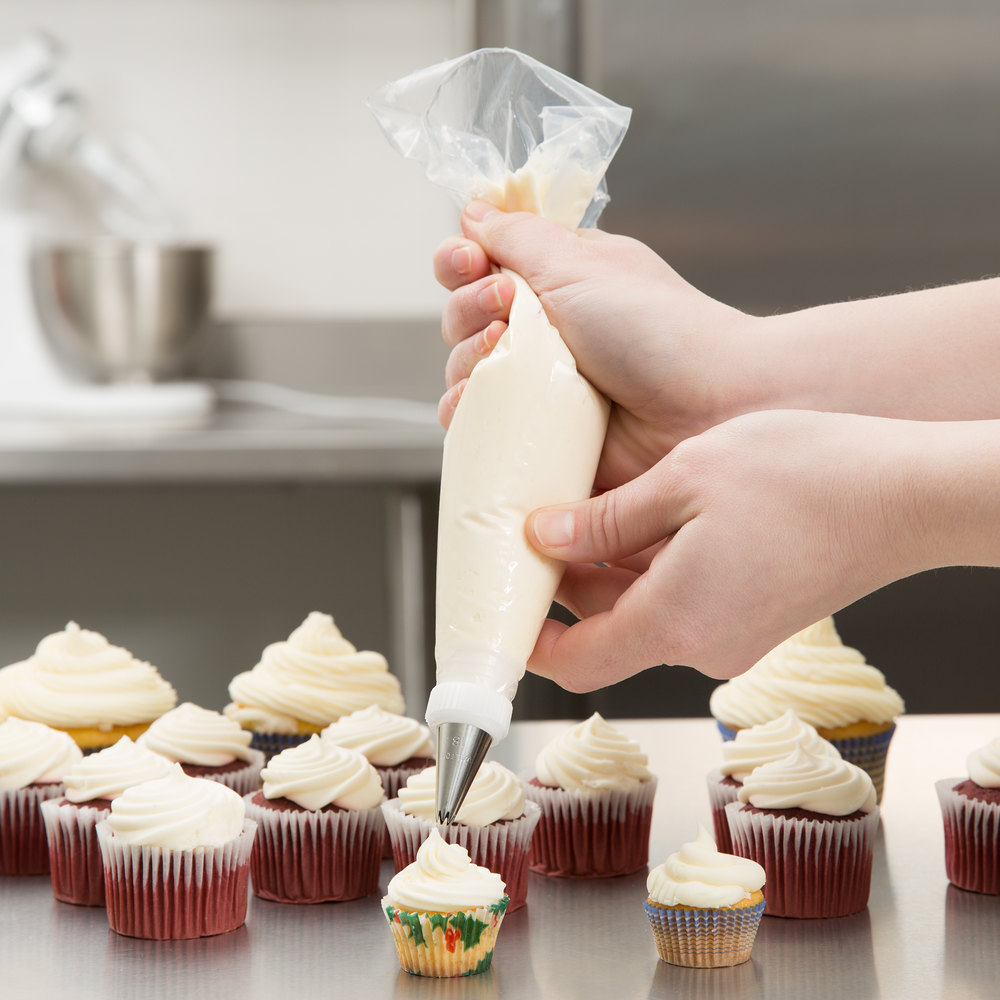
Retrieve a decorative piping bag and insert a medium sized star tip. Add 4 oz of cold frosting in the piping bag. Roll up the back end of the bag to remove additional air pockets.
Add 8 frosting star rosettes, placing 1 rosette in the center of each eighth section on the outside edge of the cake. (See photo above for an example.) There should be 1 rosette per section, making a total of 8 frosting star rosettes. This is the same for the 8” cake and the 6” cake.
Connect the frosting rosettes in each section by making small frosting stars in between each large rosette on the outside edge of the cake.
Place 8 animal cookies in the frosting rosettes upright, alternating pink and white cookies.
Add sprinkles along the top area of the ice cream cake.
Gently clean the edges of the cake board. Place the cake in a plastic cake display container, print and add nutrition label, and store in the display freezer to sell.
Chocolate Delight Recipe & Decoration Instructions

The Chocolate Delight consists of two chocolate cake layers, and two chocolate flavored ice cream layers with chocolate flakes mixed in. It is also topped with chocolate cone coat drizzle and chocolate flakes.
Ice Cream Layer Recipe
Note: Please watch the Chocolate Delight Training Video before beginning the steps below.
Retrieve the Kalva Candy Crown Chocolate Coating, also known as cone coat. Put 2 oz of cone coat in a mix-in pan (1/9 pan).
Be sure the cake is cold before proceeding with the candy coat so the chocolate drizzle can solidify. If needed, place the ice cream cake in the freezer for 10–15 minutes prior to starting the decoration.
Microwave the cone coat for 10 seconds. Note: Stainless steel mix-in pan is microwave safe.
Retrieve the pan from the microwave. Stir the cone coat with a plastic spoon. If it isn’t at a runny consistency, put it in the microwave again for 5 seconds and stir again afterwards with same plastic spoon.
Apply the chocolate drizzle by holding the spoon a few inches above the top edge of the cake and slowly moving it back and forth around the cake.
Please refer to the video training before applying the chocolate drizzle.
If the cone coat begins to thicken in the pan before you have finished applying the cake drizzle, put the pan back in the microwave for 5–10 seconds, stir the cone coat, and then continue drizzling the cake.
If you mess up on part of the drizzle, let it solidify so you can easily flick off the chocolate piece and re-do the desired area.
Retrieve the chocolate flakes. The 6” cake needs 1 tablespoon of chocolate flakes, and the 8” cake needs 1 1⁄2 tablespoons of chocolate flakes.
Sprinkle the chocolate flakes around the top center area of the cake. Leave an inch of room on the edges for the frosting stars.
Retrieve a decorative piping bag and insert a medium sized star tip. Add 4 oz of cold frosting in the piping bag. Roll up the back end of the bag to remove additional air pockets.
Apply frosting stars along the outside edge of the cake with the white frosting.
Gently clean the edges of the cake board. Place the cake in a plastic cake display container, print and add nutrition label, and store in the display freezer to sell.
Raspberry Cheesecake Recipe & Decoration Instructions

The Raspberry Cheesecake consists of two white cake layers, and two raspberry and cheesecake flavored ice cream layers with frozen raspberries mixed in. It is also topped with raspberries.
Ice Cream Cake Recipe Review
Note: Please watch the Raspberry Cheesecake Training Video before beginning the steps below.
Prepare 4 oz of white frosting in a piping bag with a tip.
Prepare an additional 5 oz of pink frosting in decorative bag with large round tip.
Tint the frosting in this bag pink by adding 3 drops of red food coloring to white frosting in separate bowl.
Use spatula to mix and place frosting in piping bag with tip.
Don’t use flavors to add color because they will solidify the frosting and make it impossible to spread.
Do not mix in the red food coloring completely because you want a marble looking color and it keeps the frosting the correct consistency.
Apply a pink frosting stripe for one complete rotation around the bottom of the cake.
Just above the pink frosting stripe, apply a white frosting strip for another rotation around the cake.
Just above the white frosting stripe, apply another pink frosting strip for a final rotation around the cake. There will be a gap between the last pink frosting stripe and the top of the cake. This is intentional, it will help create a blended effect called ombre and keep the pink from the top of the cake.
Keeping the bench knife/frosting spreader vertical, rotate the turntable slowly. This will gently spread frosting horizontally to create an ombre effect See training video for demonstration.
Using the icing bag of pink frosting, create frosting dots along the top outside edge of the cake. See photo above for visual example.
Sprinkle 1 tablespoon of frozen raspberry pieces on the 6” cake, and 1 ½ tablespoons of frozen raspberries on the 8” cake. Sprinkle along the edges and leave the middle bare.
Be sure you do NOT use your hands to sprinkle raspberries pieces on the cake. It will cause the raspberry pieces to thaw and leech color onto the cake frosting.
Gently clean the edges of the cake board. Place the cake in a plastic cake display container, print and add nutrition label, and store in the display freezer to sell.
Marketing the Product
In-Store
Each customer that enters the store must be told about the new products. (Script included below)
Forms need to be printed and ready for customers at registers.
Signage needed on the line.
Freezers in stores will have cakes premade and displayed. Signage letting customers know about product and available custom ordering.
Sidewalk/Front Door signage would help as well.
Samples
Table Tents
Social
Build-up to launch date for each store.
Create video/content while making display cakes.
Offers, discounts,
Advertise sample days (take pics and get content with customers during sample promotions), offer limited time bounce-back coupons for samplers.
Remind customers that this is an easy (and impressive!) solution. They don’t have to buy ice cream separately, it’s easier to serve, etc.
Employee
Every customer that comes into our store, should be told about our Sub Zero Nitro Ice Cream Cakes. This is easy to do while they are waiting for ice cream or during check out.
“Sub Zero has some new products available over here in our display freezer. Our Sub Zero Nitro Signature Ice Cream cakes can be taken home now or you can create a custom cake to pick up later.”
Notes for Employees:
Use an open hand and gesture towards the freezer when speaking about the ice cream cakes. An open hand is seen as inviting and warm, while pointing can be seen as rude and cold. This will help customers feel comfortable and happy while you advertise for Sub Zero’s new product.
If the customer mentions an event coming up, happily suggest it right then during the conversation. For example, “You know we have ice cream cakes already made right here! You don’t have to bake or make a trip to another store. We have you covered with our amazing signature cakes!”
We are not pushing the product onto the customer, just making them aware of it. They will never purchase an ice cream cake if they are never aware that we carry them.
Be excited/sincere about the product and they’ll see that. (Let employees taste one so they can rave about how good it was.)
If they mention the cakes from the graphics, talk to them about the cakes. “We have these cakes ready to go or you can customize one of your own with our flavors, mix-ins, and toppings.” A memorable, personalized cake was never easier
Appendix A - Sub Zero Nitro Ice Cream Cake Prep Print Out
You will mix the ice cream layers as instructed for each signature cake. Place in silicone pans and freeze 8–10 hours or overnight. Remove from silicone pans, store in puck form in plastic wrap or gallon plastic bags (with date and label), if needed.
Cut cake out of thawed sheet cakes. Place on cake boards, cut in layers, wrap layers individually in plastic wrap, label and date, and freeze to have ready for assembly.
* All cakes will be assembled in this order.
* After the first cake and ice cream layer, apply a layer of frosting. Smooth frosting out evenly.
* After cake is assembled. Base coat needs to be applied. Work in a cool area and return ice
cream cake to freezer to harden as needed.
Appendix B - Birthday Cake Signature Cake Print Out
 Use this picture, procedure, and recipe to make the Birthday Cake Signature Cake.
* Remember: 2 ice cream layers per cake. Each layer is made in a separate bowl, frozen to soft serve consistency, spread in one silicone pan, and frozen into a hard puck before cake assembly.
* Cake assembly will take two frozen cake layers and two frozen ice cream layer pucks. Cake decorations will be on top of the assembled ice cream cake with a base coat that has been in the freezer for at least 10 minutes.
* Decorate as shown in the picture above,following instructions in training video and SOP.
Appendix C - Chocolate Delight Signature Cake Print Out

Use this picture, procedure, and recipe to make the Chocolate Delight Signature Cake.
* Remember: 2 ice cream layers per cake. Each layer is made in a separate bowl, frozen to soft serve consistency, spread in one silicone pan, and frozen into a hard puck before cake assembly.
* Cake assembly will take two frozen cake layers and two frozen ice cream layer pucks. Cake decorations will be on top of the assembled ice cream cake with a base coat that has been in the freezer for at least 10 minutes.
* Decorate as shown in the picture above,following instructions in training video and SOP.
Appendix D - Raspberry Cheesecake Signature Cake Print Out

Use this picture, procedure, and recipe to make the Raspberry Cheesecake Signature Cake.
* Remember: 2 ice cream layers per cake. Each layer is made in a separate bowl, frozen to soft serve consistency, spread in one silicone pan, and frozen into a hard puck before cake assembly.
* Cake assembly will take two frozen cake layers and two frozen ice cream layer pucks. Cake decorations will be on top of the assembled ice cream cake with a base coat that has been in the freezer for at least 10 minutes.
* Decorate as shown in the picture above,following instructions in training video and SOP.
Appendix E: Display Freezer Information
HOME / REFRIGERATION / GLASS DOOR FREEZERS
Gene Shook or Laura David (Asst)
Direct: 310-292-1182
Atosa MCF8703 Bottom Mount (2) Two Glass Door Freezer
HOME / REFRIGERATION / GLASS DOOR FREEZERS
RETAIL $3,750.00 + $230.00 Shipping (1-Day)
Our Price: $2,550.00 + $230.00 Shipping (1-Day)
*Buy two at one location = FREE shipping
Standard set-up is 0 - (-9) degrees. The Digital Control panel can “Override” up to (-20) degrees.
True White LED Strip, not Yellow.
Atosa MCF8701 Bottom Mount (1) One Glass Door Freezer
HOME / REFRIGERATION / GLASS DOOR FREEZERS
RETAIL $2,450.00 + $150.00 Shipping (1-Day)
Our Price: $1650.00 + $150.00 Shipping (1-Day)
*Buy two at one location = FREE shipping
Standard set-up is 0 - (-9) degrees. The Digital Control panel can “Override” up to (-20) degrees.
True White LED Strip, not Yellow.
Related Articles
Ice Cream Cake Employee Recipe Printable
Ice Cream Cake Recipes pdf printable file Appendix A - Sub Zero Nitro Ice Cream Cake Prep Print Out Cream Needed for Nitro Ice Cream Cake Layers Size Amount of cream per layer Recipe used per layer Amount of cream per cake 6” Ice Cream Layer 12 oz ...Keto Nitrogen Ice Cream SOP
Keto Nitrogen Ice Cream Standard Operating Procedure Introduction Keto Ice Cream is frozen the same way as any other Sub Zero Nitrogen ice cream. The ingredients are just catered to the special Keto diet. The keto diet encourages a very low amount of ...Keto Nitrogen Ice Cream SOP & Printable Recipe
Here is the link to the printable Keto SOP. Here is the link for only the printable Keto Recipe. Here is the link for the carb count for Keto made to recipe specs. Keto Nitrogen Ice Cream Standard Operating Procedure Introduction Keto Ice Cream is ...Waffle Bowl SOP (Standard Operating Procedure)
https://drive.google.com/file/d/1Xr_bLiW_hIdjF9oYYfefuq4i6CD6yXHT/view?usp=sharing Waffle Bowl Standard Operating Procedure Introduction Waffle bowls are freshly made pastries with a similar texture to a waffle or wafer. This popular product allows ...Hot Drinks SOP
Printable doc found here Hot Drinks, Affogato, and Hot Chocolate Float Standard Operating Procedure Introduction: With the colder temperatures of fall and winter, hot products are a great way to draw more customers in. These hot products pair ...